ProActive Quickstart - Workflow execution
With ProActive, workflows are executed by the Scheduler as jobs made of tasks. A task is the smallest schedulable entity, it can be a script, a native executable or a Java class.
In this tutorial we will create a simple job, submit it to the scheduler and monitor its execution. For each step, we show different ways to perform it, using different tools such as the Workflow Studio, the REST interface or the command line.
1 Create a job
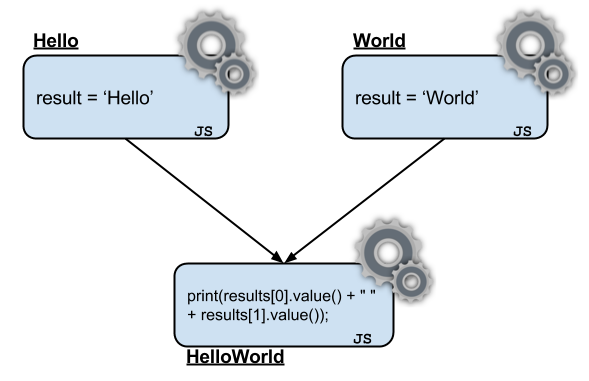
We start with a sample job printing 'Hello World!'. The first two tasks simply return 'Hello' and 'World' and the third task prints the results of the previous tasks. Here we introduce the notion of dependencies between tasks, the task 'Hello World' will only be executed after the tasks 'Hello' and 'World' are finished.
Note that due to the parallel nature of ProActive, the execution order of 'Hello' and 'World' is not predictable and the job could output 'World Hello'. Of course, we could add more dependencies to prevent the parallel execution of the tasks.
You can download the job in its XML format to submit in the next step or preview it.
You can access the Studio at http://trydev.activeeon.com/studio.
Follow these steps to create your very first workflow:
- Fill in the name of the job in the left panel
- Create a new Javascript task by dragging and dropping "javascript" under the task icon. Click on the task and fill in the name and script content with result = "Hello";
- Create another task that is also a script task and that returns "World". Its script content should be result = "World";
- Then create the last script task with the script print(results[0].value() + " " + results[1].value());
- Now you can create dependencies so the task HelloWorld retrieves the results from the two other tasks. It is done by dragging links from one task to another.
Jobs are written in XML using a custom grammar. Below you can see the XML written for the Hello World job.
<?xml version="1.0" encoding="UTF-8"?>
<job xmlns="urn:proactive:jobdescriptor:dev" xmlns:xsi="http://www.w3.org/2001/XMLSchema-instance"
   xsi:schemaLocation="urn:proactive:jobdescriptor:dev http://www.activeeon.com/public_content/schemas/proactive/jobdescriptor/dev/schedulerjob.xsd"
   name="Hello_World">
  <description>A simple Hello World job</description>
  <taskFlow>
    <task name="Hello">
      <scriptExecutable>
        <script>
          <code language="javascript">
            result = "Hello";
          </code>
        </script>
      </scriptExecutable>
    </task>
    <task name="World">
      <scriptExecutable>
        <script>
          <code language="javascript">
            result = "World";
          </code>
        </script>
      </scriptExecutable>
    </task>
    <task name="HelloWorld">
      <depends>
        <task ref="Hello"/>
        <task ref="World"/>
      </depends>
      <scriptExecutable>
        <script>
          <code language="javascript">
            print(results[0].value() + " " + results[1].value());
          </code>
        </script>
      </scriptExecutable>
    </task>
  </taskFlow>
</job>
2 Submit a job
The scheduler Web portal enables you to submit jobs, to monitor their execution and to retrieve results. To submit a job with the portal:
- Download the job from the previous step
- Go to the demo portal at http://trydev.activeeon.com/scheduler
- Login with your credentials that you received by email
- Click on the Submit job button at the top
- Select import from file from the dropdown list, then click on the button choose file and select the file you downloaded
- Upload the file then Submit!
Your job should appear in the job list panel
To submit a workflow from the Studio, simply click on the execute button and fill in your credentials that you received by email.
ProActive exposes a REST API (actually also used by the web portals) that enables the user to submit jobs. Below is an example using cURL and Bash (make sure you replace the credentials with the ones you received by email.
# first we login and retrieve a session id
$> sessionid=$(curl -d "username=YOURLOGIN&password=YOURPASSWORD" https://trydev.activeeon.com/rest/scheduler/login)

# then we submit the job
$> curl -H "sessionid:$sessionid" -F 'file=@hello_world.xml;type=application/xml' https://trydev.activeeon.com/rest/scheduler/submit

# returns JSON such as: {"readableName":"Hello_World","id":1}
ProActive also provides command line tools; they can be downloaded from the download section (Server archive under the ProActive Workflows & Scheduling section). Unzip the archive and follow the instructions below:
To run the scheduler client:$> ./bin/proactive-client -k -u https://trydev.activeeon.com/rest -l YOUR_LOGINThen you can login with your credentials and you should be able to submit a job using the command submit and the path to the job as the argument.
$> login('YOUR_LOGIN')
renewing session ...
password:*****
Session id successfully renewed.
$> submit('hello_world.xml')
Job successfully created !
Job('hello_world.xml') successfully submitted: job('1')
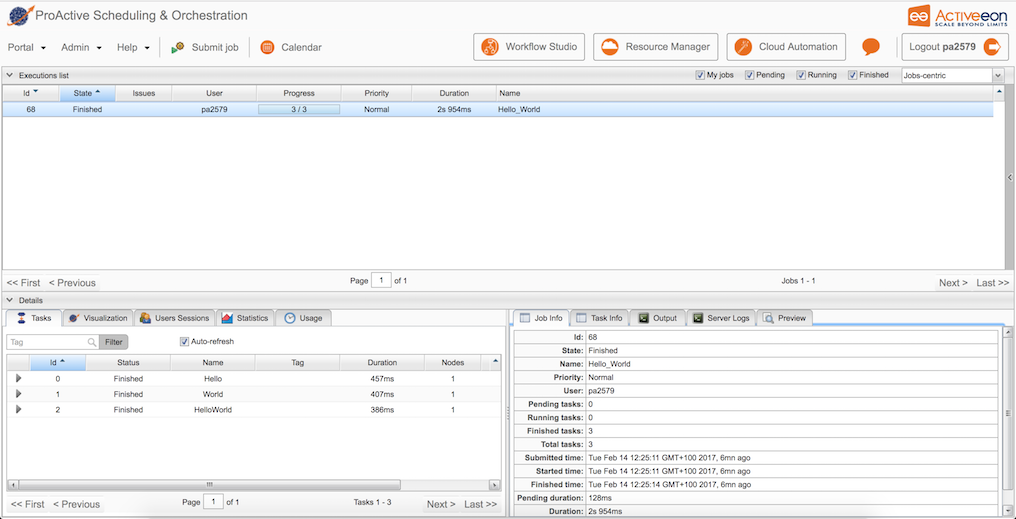
3 Monitor execution and visualize results
Select the job you submitted to view detailed information about the tasks, the output, the execution times, and more.
To see the resulting output of the job, go to the output panel, and click on the fetch button.
Using the same session id as for the job submission, you can retrieve the job status:
$> curl -H "sessionid:$sessionid" https://trydev.activeeon.com/rest/scheduler/jobs/1 | python -mjson.tool
will output something like:
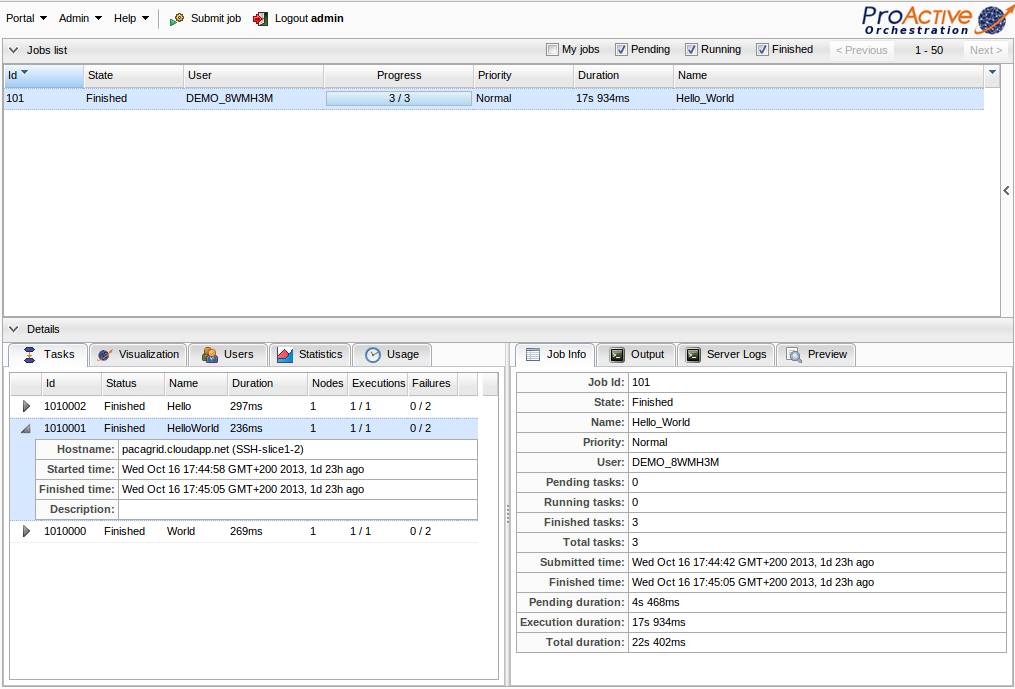
{
    "id": 101,
    "jobInfo": {
        "finishedTime": 1381938305027,
        "jobId": {
            "id": 101,
            "readableName": "Hello_World"
        },
        "jobOwner": "DEMO_8WMH3M",
        "numberOfFinishedTasks": 3,
        "numberOfPendingTasks": 0,
        "numberOfRunningTasks": 0,
        "priority": "NORMAL",
        "removedTime": -1,
        "startTime": 1381938287093,
        "status": "FINISHED",
        "submittedTime": 1381938282625,
        "totalNumberOfTasks": 3
    },
    "name": "Hello_World",
    "owner": "DEMO_8WMH3M",
    "priority": "Normal",
    "projectName": "Not Assigned",
    "tasks": {
        "1010000": {
            "description": null,
            "iterationIndex": 0,
            "maxNumberOfExecution": 1,
            "maxNumberOfExecutionOnFailure": 2,
            "name": "World",
            "numberOfNodesNeeded": 1,
            "parallelEnvironment": null,
            "replicationIndex": 0,
            "taskInfo": {
                "executionDuration": 269,
                "executionHostName": "pacagrid.cloudapp.net (SSH-slice1-7)",
                "finishedTime": 1381938295170,
                "numberOfExecutionLeft": 1,
                "numberOfExecutionOnFailureLeft": 2,
                "startTime": 1381938287094,
                "taskId": {
                    "id": 1010000,
                    "readableName": "World"
                },
                "taskStatus": "FINISHED"
            }
        },
        "1010001": {
            "description": null,
            "iterationIndex": 0,
            "maxNumberOfExecution": 1,
            "maxNumberOfExecutionOnFailure": 2,
            "name": "HelloWorld",
            "numberOfNodesNeeded": 1,
            "parallelEnvironment": null,
            "replicationIndex": 0,
            "taskInfo": {
                "executionDuration": 236,
                "executionHostName": "pacagrid.cloudapp.net (SSH-slice1-2)",
                "finishedTime": 1381938305027,
                "numberOfExecutionLeft": 1,
                "numberOfExecutionOnFailureLeft": 2,
                "startTime": 1381938298097,
                "taskId": {
                    "id": 1010001,
                    "readableName": "HelloWorld"
                },
                "taskStatus": "FINISHED"
            }
        },
        "1010002": {
            "description": null,
            "iterationIndex": 0,
            "maxNumberOfExecution": 1,
            "maxNumberOfExecutionOnFailure": 2,
            "name": "Hello",
            "numberOfNodesNeeded": 1,
            "parallelEnvironment": null,
            "replicationIndex": 0,
            "taskInfo": {
                "executionDuration": 297,
                "executionHostName": "pacagrid.cloudapp.net (SSH-slice1-6)",
                "finishedTime": 1381938295447,
                "numberOfExecutionLeft": 1,
                "numberOfExecutionOnFailureLeft": 2,
                "startTime": 1381938287439,
                "taskId": {
                    "id": 1010002,
                    "readableName": "Hello"
                },
                "taskStatus": "FINISHED"
            }
        }
      }
  }
}
Feel free to explore the REST API documentation to discover more functionality.
Using the same setup as during the job submission, you can retrieve states, results and outputs on the command line:
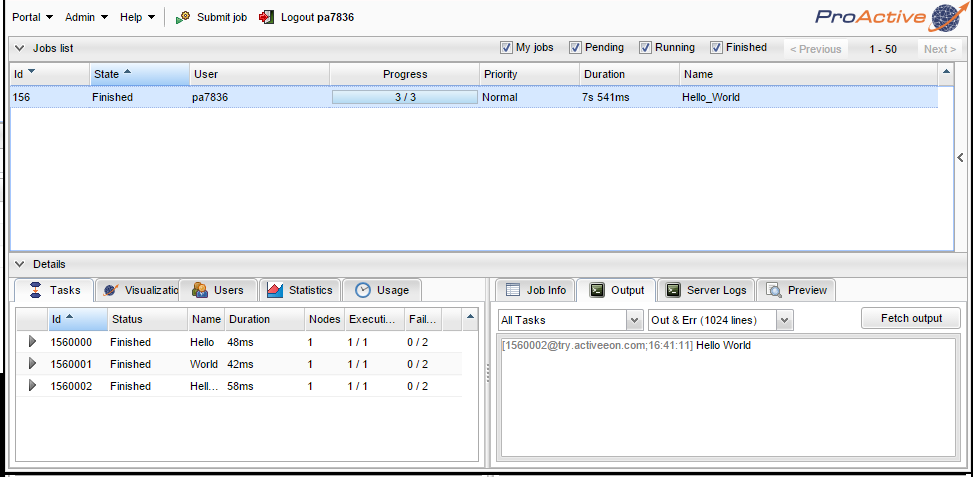
$> jobstate(1)
Job '1'    name:Hello_World    owner:DEMO_8WMH3M    status:Finished    #tasks:3
     ID        NAME         STATUS     HOSTNAME             EXEC DURATION   TOT DURATION   #NODES USED   #EXECUTIONS   #NODES KILLED
     1010000   World        Finished   pacagrid. (SSH...    269ms   8s  76ms      1             1/1           0/2
     1010001   HelloWorld   Finished   pacagrid. (SSH...    236ms   6s 930ms      1             1/1           0/2
     1010002   Hello        Finished   pacagrid. (SSH...    297ms   8s   8ms      1             1/1           0/2

$> joboutput(1)
[1560002@trydev.activeeon.com;16:41:11] Hello World
You can use the help command (help()) to list all available commands.
- a more complex workflow
- the tutorial on resource management — to understand where the task was executed
- go through our documentation for more details